It was a dark and stormy night…
…OK, it wasn’t, but it was a wet, cold and windy afternoon of the type that does not inspire me to head out to the tent and work on the chassis.
My head was off being welded, the barrel was off being re-bored. In truth there’s plenty to do, but I decided to deal with a nagging doubt, and practice my turning skills a bit.
As I’ve mentioned before, I’m impressed with the cheap Indian valve cutters I bought, but not entirely happy with the quality of the handle, which could effect the concentricity of the cut.
As it happened I had a nice bit of 16mm 303 stainless under the bench (left over from some abandoned project or other, I suspect) so it felt like time to build a new handle.
Now, I imagine I can build something like the original, but a bit better. On the other hand the only way to truly guarantee lasting concentricity would be to make in one piece. Yes, it would only fit 3/16” valve guides, but any bike I’m likely to work on in the near future has them, and it won’t cost me anything to make another one in a different size should the need arise.
So, step 1 was to identify the threads on the cutters. Actually, it’s easier to look at the ones on the handle. It was half an inch diameter and 20tpi, so according to my charts that should be ½” UNF. I could have sworn it looked like a 55 degree thread and not a sixty, but my eyesight is nowhere near that well calibrated, so UNF it is.
Step 2 was pretty much waste work. I wanted to know that I could actually reproduce it reasonably.
There was no waste material involved, because I just tried it on the end of the bar that would later be turned down to form the pilot.
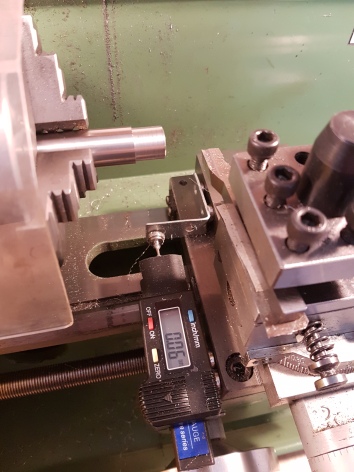
It was something of a joy to be working in stainless. I’ve done a few bits in mild steel recently and it’s virtually impossible to get a decent finish on it, especially with a little lathe, so the stainless boosted my flagging confidence a bit. Notice the digital readout on the cross slide. It’s made from a £5 digital tread depth gauge.
However, I digress, frequently.
Once the end of the bar was down to size it was time to run the lathe upside down and backwards, honest. In the first incidence, little lathes are pretty poor at running parting tools, which is what’s needed to cut the relief at the back of the thread. The whole machine is just a bit too flexible for the forces involved, so running them backwards with the tool upside down reduces the consequences of chatter. Effectively the tool is pushed off the work, rather than digging in underneath it.
With that done it was time to cut the threads, when the backwards bit it even more useful.

The problem is that, by definition, to cut the thread the machine must feed automatically, in sync with it’s rotation. There’s a little dial down by the leadscrew which allows you to re-engage the halfnut (that’s the drive to the longitudinal feed) such that it cuts in the same place on every pass. So you need to engage it at precisely the right moment, as the dial goes round.
Then, since a right hand thread feeds towards the chuck, you have to disengage it in that tiny gap between the end of the thread and the body of the part. If you don’t it all crashes, makes a hell of a mess, destroys the part and quite possibly some of the lathe gears…nasty.
With a very short thread like this one you’ve got maybe half a second or so to shift your attention from the dial to the tool and disengage it.
However, by running it backwards, it feeds away from the chuck, leaving you lots of time to overrun without damaging anything.

The net result being a thread that fits the cutters very nicely indeed. Having never done that before, I was quite chuffed.
But then turned it all off again to make the pilot part of the handle. I didn’t turn it right down to size at this point, because I wanted a decent finish on it (which means using the down feed) and couldn’t be bothered to change the gears back from the threading pitch until I’d finished with them.

With that done it was time to repeat the threading exercise and try it out with a cutter. Getting close!
Here’s a simple, but sneaky trick (well, I was impressed when I saw it) if you want to drill a hole nice and centrally through a round thing. Chop a bit off the end, bore a hole in it in the lathe, then use it as a guide… guaranteed!

So, here’s the finished product, ready to roll.

