

A simple(ish) little job, but nonetheless one that has to be done. Well, some of it has to be done and some if you only do if you’re an idiot who like shiny things.

Whipping off the tappet adjustment covers is pretty obvious. As is the single nut that secures the decompressor. Actually the decompressor lever took a bit of levering off, but only due to years of claggy oil.
Now then, the rocker shafts on most of the BSA singles are an interference fit, or at least extremely tight, so you’ll have to use heat to remove them.
First whip the cover off the side ( thirty seconds with a screwdriver) Then it’s a good idea to clean and degrease the whole thing as best you can. Or you’ll stink the oven out.
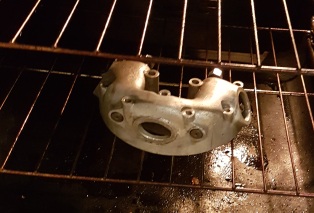
Slap it in the oven, set it to 180C and when the oven’s up to temperature, so’s the casting.

And you only need a tiny soft faced hammer (I made mine out of a bit of re-bar and gave it one aluminium face and one nylon one) to tap them out. Be careful tapping on the threaded end. There is a centre drilling that you can stick an old phillips screwdriver in if you’re nervous about it.
Make sure you keep the shafts in the right place until you get them labelled, they’ve been in there a long time and won’t want to be swapped over.

While it’s hot, take the opportunity to remove the hollow locating lug(s) as well. You’ll notice that the box looks very empty on this picture, which is an optical illusion and definitely not caused by me forgetting to do so and having to heat it up again.
The rockers themselves just pull out. You’ll have to take the exhaust rocker out before the decompressor shaft, which you might have to fiddle a bit to get it clear of the rocker end.
Old fashioned tie on labels are great for this sort of job, because the string enables you to keep all the springs and spacers in the right order.
There is some debate over whether I’ll use those springs (Some say it’s better to make up accurate shims) but I’ll deal with that when I get to reassembly.

Having got the casting cleanish and empty, I was able to get a good close look at it. At a quick glance and before cleaning it I’d pretty much assumed that the bikes owner really wanted a Honda and, not being able to afford one, had taken out his resentment, starting every day by picking up his favorite spanner and dealing it a firm clout across the rocker box. How else could it have got so battered looking?
Alas, a fine story though it would have been, I don’t think it’s true. In fact, looking at the rocker box probably affords one a very good insight into the general state of BSA in 1962.
It works, but it’s appalling!

It’s one thing to leave it rough cast (though I think the back may have a had a cursory swipe across a linisher) but look at it. If you look at the two “flat” faces in the picture above, one looks like a reasonable cast surface while the other one looks like it’s concrete set in raw plywood shuttering…and they’re on the same casting. The surface on the top is as bad or worse and…

There are voids in it. This last is the most worrying, because it’s impossible to tell whether I’ll be able to take enough material off to make it smooth, without opening up more of them.
That should really be a good enough argument for me to give up on polishing, get it aquablasted and point out to observers that it’s in aid of originality, but I’m not going to. I’m sure the job will be far more effort than it’ll be worth, but I want it shiny. So there.
I went into polishing ally a bit when I was blogging about Little Suzi and the technique hasn’t changed since. It’s simply a matter of scratching the surface off with increasingly fine abrasives, until it looks nice and shiny and smooth.
What also hasn’t changed is the moment when you really regret starting it and think it’ll never look decent again!

I started with a detail sander, using 80 grit, then 120 grit. That’s as fine as standard abrasives get for the thing, but I did find some hook and loop 400 grit that I could cut to size, good ole fleabay again!
The detail sander leaves a finish something like this…

,
A bit drastic, but flat, and it was necessary to remove close on 1mm of material to get past all that rough casting, so drastic measures were called for.
Now, at some point in that process, you may well accidentally leave the sander still for too long. When you lift it off, you’ll see a really neat geometric pattern and, if you’re mind is anything like mine (and if it is, God help you) you’ll think “Ooh look, that must be how they do the pattern on that fancy engine turned aluminium sheet that they make racing car dashboards and such out of.
Do NOT try leaving still for a few seconds longer to see how the pattern develops. The little circular grooves take bloody ages to sand out again!
Once over that error, one naturally assumes that there must be a really clever way of getting into all the little corners.

No there isn’t! or if there is, I don’t know it. I used a rotary tool (cheapo dremel-alike) and a whole range of abrasive drums wheels stones and cutters. Even then you will end up with little bits of wet and dry in your (sore) fingers, scraping away.

This is the main range of attachments I used. That bottom one was very good, but a bit costly (£20 for ten). They come in a good variety of grades and consist of paper wound onto a 3mm or so mandrel and glued in place. That means you can unwind them to the desired diameter for tight corners.
Once the limits of the detail sander are reached its down to using the “dremel” on the whole thing, which gets one to about here…

You’ll notice, now, that one of the gasket faces for the oil feeds was starting to look perilously thin, by the time I’d taken off enough material to get it smooth.
My intent was to cut that back at the end to create a big enough face and it worked out fine. I didn’t take much, so there shouldn’t be a need for an extra gasket.
From here on out it’s pretty much down to hand sanding with wet and dry down to 2000 grit, before hitting the buffing wheel.
Speaking of which. If, like mine, your working area can be described as “compact and bijou”, you’ll find it well worth investing a few pennies (literally) in some of these…

They’re simply a giant woodscrew on the outside and a metric thread (in this case M8) on the inside. What they do, however is allow one to quickly mount and dismount bits of kit to your bench, without resorting to annoying and unreliable clampery.

I got the motor for my buffing wheel from a junk stall at the local market and the abors, wheels and various compounds I bought as a kit at one of the classic bike shows. Brown and blue compounds are all you’ll need for ally.

Having got the thing pretty much shiny, though you can see there’s still some detail work to do at this stage. It’s time to remember that the most important surface on the whole casting won’t be seen. Namely, the gasket face.
It’s quite hard to show how uneven it is on a photo, but one side of the centre section was very badly scored and, probably more to the point, somewhat lower than the rest of the surface.
The answer is plate glass. I use a glass chopping board that I got for a fiver.
Traditionally, one would coat the surface in grinding paste and rub it against the glass in a sort of figure eight pattern. Nowadays, people tend to tape a piece of wet and dry to the glass, which is less messy.
I tried both and found the grinding paste to be more effective, but it left me paranoid about getting it all cleaned out. Lets face it, any trace that’s left is guaranteed to find it’s way into the oil system, lodge somewhere sensitive and destroy the entire engine.
What I found quite interesting was how it looked after a couple of minutes.

So the gasket face was obviously curved and won’t meet at all around that stud, but it doesn’t take too long to get it looking uniformly grey and dull, which is how it should be. There’s no need to polish it, as long as it’s flat. In fact, I’m not sure whether a shine would be counter productive. I’m a big fan of blue Hylomar and I reckon it’s probably better with something to key to. No doubt somebody who knows what they’re talking about will soon correct me.
Anyway, it ends up looking like this…

