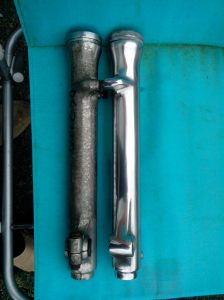
This is something which I’ve got steadily better and braver at over the course of the build and running of little Suzi. I have yet to figure out exactly why one can buy a brand new bench grinder for £20, yet it costs £60 for a polisher, but unsurprisingly the result is that I haven’t got one. I did try a sisal wheel in an electric drill and it seemed to have little or no effect whichever compound I used, so that was clearly for something much nearer to finished.
In the end I came upon a very simple process that doesn’t take anywhere near as long as one would imagine it does.
Now, the big problem with polishing ally bits is that you must first destroy whatever finish is on there. You get used to it after a while, but for the first few cherished items you refinish there will come a point where you make loud reference to some sort of bodily function (be it digestive or reproductive) the general gist of which will be “It’s Ruined!”
It helps to remember the blindingly obvious. One cannot fill up a scratch by polishing. That means that the only way to polish out a scratch is to scrape off the rest of the finish, down to the level of the bottom of it. The only way to do that effectively is with some sort of coarse abrasive, which leaves the whole shebang a mass of ugly scratches. Courage mon brave! repeating the process with successively finer abrasives will bring it back better than before… eventually.
It’s also worth remembering to tailor your aproach depending what you’re doing. The Suzuki fork legs were very much built to cost. Most of the front was a fairly good brushed finish, most of the back was a bit coarser and all the bits that either don’t show or are difficult to get at were left rough cast.
Since I was working on a cheap 1990’s commuter, I was delighted to take the whole lot down to something nice and shiny, removing casting marks and part numbers as I went.
Do that to George Brough’s personal prototype racer and you’ll probably be wiping tens of thousands of pounds off the value, so think before scrubbing!
While on the subject of “overpolishing” be very careful around dust and oil seals. It’s almost impossible to polish to a sharp edge without rounding it off a bit, which could affect the function of things, especially the fit of rubber seals. Either stop a bit short, or mask the very edge to keep them sharp.
I started with 400 grit wet and dry (very wet, with a splash of fairy liquid in the water) then 800, then 1200 then (and this is when it starts to look really good) a Brillo pad. The Brillo pad makes a hell of a mess with all the soap, but it does bring up a nice shine. Then finally wash and dry it and go over with a J cloth and Solvol. The final stage is a bit disappointing at first, because the Solvol leaves a dull grey deposit, but once washed off you will be proud of the result. How good a finish you get is really down to time, patience and what you can be bothered to do.
If you go to the length of taking out deep scratches and dings, then you’re going to have to start with something really aggressive (much later when I did the front forks I started with a Black and Decker Mouse sander and 180 grit) but then you’re making a lot of work getting back to a shiny finish. I eventually found some fantastic 3M sanding pads at a car boot sale. They’re on a firm foam background about a quarter of an inch thick and come in grits from 400 to 1200 and most points in between. They don’t fall apart when wet and are really easy to use. For this round I opted to retain a certain degree of “patina” and remind myself of the twenty foot rule. If you don’t know what the twenty foot rule is then you clearly haven’t carefully read the whole of this blog, which is absolutely fine by me… but I’m still going to be mean and not tell you, just because I can.
Keeping any sort of shine on ally bits is something that’s debated to death in many, many different forums. There are a couple of treatments (I seem to remember Zoop being one) which are alleged to be very good, but are quite expensive. A coat of clear lacquer can produce fairly good results, but will yellow and peel, isn’t quite as shiny and won’t work on hot bits. Or you can just polish the thing on a regular basis. I’m no nearer to the answer than anyone else. I tried lacquer on the rear brake plate, but it looked manky, so I gave it a coat of wax. On the other hand lacquer looked fine on the brake and gear levers (different alloy) so it becomes a sort of pick and mix arrangement.
